Promotion Items

the KILN @Indiegogo
4hr Courses

Dear Friends, Guitaring Passionately has began its inaugural acoustic guitar making process in early 2017. Do stay tuned to the progress thru instagram and Facebook.

Check out our Price Busters

Learn practical guitar maintenance skills in our 4hr Courses. Brochure Download here
Showing posts with label String Height. Show all posts

Thursday, April 18, 2013

Bite Size Tips 004B – Buzzing No More!


In the article 004A, I have featured string buzzing due to low string height. This one will discuss neck relief (resulted from neck straightness) instead. Before we proceed, string height and neck relief are two different attributes found on guitars. Don’t mix them up by assuming that they are the same thing. Lets’ begin by understanding neck relief, its meaning and functions.

There are a few ways to understand neck relief. Primarily it refers to straightness of guitar neck that resulted the amount of string clearance between the fingerboard or fret wires with the strings measured at 6, 7 or 8th fret. At least this is my comprehension of neck relief. It is essential to have sufficient neck relief because it governs string clearance, which in turn governs the tonal quality of guitars when played. Without string clearance, guitar strings will not have enough space to oscillate freely without being obstructed. This is one of the main causes for acoustic guitars sounding thin and choked.

Basically there are three types of neck relief situations.

1. Concave or “Bow” neck.
2. Convex or “Hump” neck
3. Straight neck

Below shows an image illustrating the three different situations.
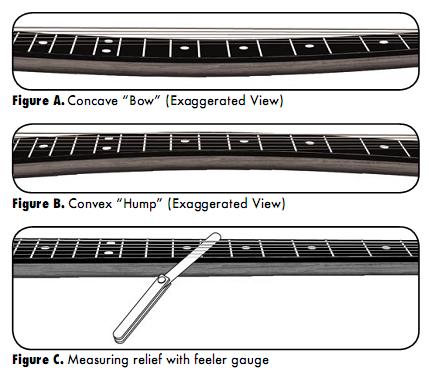

Taken from: http://www.rockwellguitarclinic.com/images/relief.jpg 

Fortunately most acoustic guitars are fitted with truss rod with their necks. The purpose of the truss rod is to add strength to the neck and also compensate any neck distortion. It does so by a compressive mechanism built into most truss rods where two different rods of two differing length are used to produce the desired “distortion” to counter the natural ones. See below picture illustrated the working principles of such adjustable truss rods.


Taken from: http://proguitarshop.com/media/cms/blog/trussrodadjustment.gif


Taken from: http://i779.photobucket.com/albums/yy77/unclefogey/trussrod.jpg

There were fixed truss rods used in the past. Martin Guitars has introduced the Martin T-bar in the xxxx. Truss rods of the like are mean to add strength to guitar necks so as to resist neck distortion. However the immense combined string tension will inevitably distort guitar necks over time. Below shows three different types of truss rod ends.


Taken from: http://www.fretnotguitarrepair.com/images/truss-rod/martin-truss-rods.jpg

String buzzing related to neck relief is caused by convex or hump necks. When guitar necks distort in the convex manner, the string clearance will be reduced. As long as this clearance is adequate, the guitar still plays decently but once the clearance tips too far buzzing starts to pop up. Is a perfectly straight neck the most ideal? I still hear debate over adopting a perfectly straight neck and slightly bowed neck. The bottom line is to allow strings to oscillate freely.

Below are two pictures showing desired neck reliefs.


Taken from: http://customguitarprojects.co.uk/wp-content/uploads/2011/08/gene_necks1-truss-rods.gif


Taken from: http://www.frudua.com/manuals/imgmanuals/figura6manicoin.gif

So how do you know how much is adequate? In most guitar technical manual, a range is always recommended as oppose to a fixed figure because this neck relief thing varies between guitars and also players’ preferences. In short, there is no one size fits all neck relief. Once has to trial and error to get the sweet spot. By knowing enough, the process of trial and error can be shorter and more effective than shooting in the dark. The picture below illustrates a way to estimate neck relief. Keeping the low E string fretted on 1st and 12th frets and use the middle finger to feel the amount of relief at 7th or 8th fret. You should feel a slight clearance between guitar string and fret wires. If a 100GSM paper can slip through this gap, the neck relief should be sufficient.


Taken from: http://www.fretnotguitarrepair.com/images/neck/checking-neck-relief.jpg

Nothing beats doing the real thing. After much talks about the rhyme and reasons, it is time to get our hands dirty. Adjusting truss rods has been a sacred ritual and only to be tempered by experts. Actually it isn’t that scary a thing. If you’re not comfortable in tempering your thousands of dollars guitar’s truss rod, do send it to a qualified person to undertake this task. Before adjusting the truss rod, make sure these things are in good order,

1. Nut and saddle are well set up, no issue with string height
2. Fret wires are not worn off excessively or uneven

It is essential to consider the above attributes because if they are the actual cause for string buzz, adjusting truss rod might be like barking at the wrong tree.

Here is a typical situation; after estimating the neck relief by hand you found that the neck relief was not adequate, or there isn’t any. You are about to adjust the truss rod.

Prepare the following equipment,

1. Truss rod wrench. It can be an allen key of socket wrench. Be sure to use the right tool as recommended by the guitar manufacturer.
2. Feeler gauge, name cards or a piece of 100GSM paper

Once you have fitted the truss rod wrench into your guitar properly, you are ready to turn it. By rule of thumb, you should always look at the truss rod end to determine the correct direction of turn (adjustment). The picture right below illustrated truss rod adjustment at the headstock. Since this situation is about creating more neck relief, you should be turning the truss rod anti-clockwise. Another words you are loosening the truss rod thus giving it the concave or bow curvature. This will result in more neck relief which leads to more string clearance between strings and neck. If you guitar’s truss rod end is within the soundbox, it is trickier as you would have to circumnavigate around the strings to do so. See the pictures below to get the idea.

A common FAQ; should I remove or loosen all strings before adjusting truss rod? It isn’t necessary because you want to adjust truss rod when the guitar is loaded with the regular string tension to achieve the “reality” in adjustments.
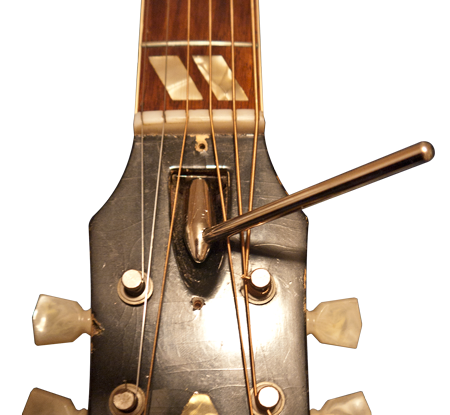
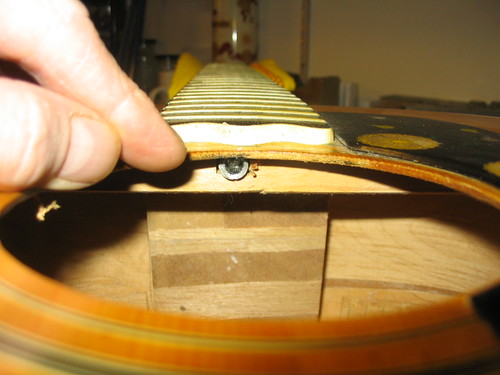

Taken from: http://www.guitarrepairbench.com/acoustic-guitar-repairs/images/acoustic-truss-rod-adjustment.png 
Taken from: http://farm4.static.flickr.com/3455/3368070468_f542e5b2fe.jpg?v=0 
Taken from: http://i2.ytimg.com/vi/IdCZEKGVZfA/mqdefault.jpg 
Taken from: http://www.stringletter.com/var/ezwebin_site/storage/images/media/agu/courses/acoustic-guitar-care-and-maintenance/how-to-set-up-your-guitar-part-1-truss-rod-adjustment/photo-gallery/truss-rod-through-soundhole/708375-1-eng-US/Truss-rod-through-soundhole_imagelarge.jpg
Taken from: http://www.sunsetstudio.net/images/trussadjust.jpg

Do not make big turns. Each turn should be no more than a quarter. After each turn, leave the guitar for about 30 minutes for the eventual curvature to set in. You can again measure the neck relief or play your guitar to determine if further adjustment is needed. You can determine the adjusted neck relief by pressing on the 8th fret while the low E string is pressed on 1st and 12th frets. Alternatively you could use the 100GSM paper to determine the desired neck relief. Repeat the illustrated processes if necessary.

The most important thing isn’t the neck relief measured figure. It is the playability. You should play the guitar to decide to adjust further or stop. Wish you the best. Thanks of reading!

Monday, December 3, 2012

Bite Size Tips 004A – Buzzing No More!

Buzzing is arguably one of most common guitar issues. It will happen in your lifetime of guitar playing regardless you’re into electric or acoustic guitars. This Bite Size article will discuss acoustic guitars buzzing. To avoid over-simplifying buzzing issues of acoustic guitars, I will highlight both the causes and solutions. Once again, this sharing comes from my personal experiences. Make sure you’re exercise good judgment and adaptability in dealing with your guitar buzzing issues.

These are few common causes for guitar buzzing issues.
  1. Low string action or height (nut & saddle)
  2. Bowed Neck which alters string relief
  3. Uneven crown heights of the fret wires
To keep the article compact, I will address a single cause in this article, i.e low string action. The other two will be addressed in subsequent postings.

Buzzing causes by low string action is commonly due to the set-up of the nut and saddle. String slots cut too deep or insufficient saddle crown height are two set up problems that contribute to buzzing. Typically, string relief for acoustic guitar ranges from 2mm to 4mm taken at the 12th fret.

Measuring string action at 12th fret

More pictures of actual guitars with low and sufficient string relief set up at 12th fret.

Low string action; the 20 cents coin contacts the string

Sufficient string action; slight clearance

Obviously replacing the wrongly set-up nut or saddle can stop the buzzing. However those who are not well practiced, it may be better to consult a qualified guitar tech. For those who DIY mostly, you could undertake the attempt. Alternatively, you can shim-up the nut or saddle to increase the string action thus reducing or eliminating the buzzing. The following pictures and descriptions will show how shim-up works for both nut and saddle. Please note that in most cases, it is not necessary to shim-up both the nut and saddle at the same time. It should be decided by whichever part that causes the buzzing.

Shim is thin strip of material that is used for aligning, fitting, etc. parts together. In this case, we will be using wood. Preferably woods that is associated with guitar making. While any wood should do the job, it is a good lutherie practice to use associated materials. Shims are commonly made from veneers. The picture below showed maple veneers. Well, veneers are thin layers of wood. Maple veneers are pretty common in the market.

This may raise the question about the resulting sonic properties of the guitar fitted with shims. By and large, maple is hardwood that possesses acoustic properties therefore it should not adversely affect the guitar tone. However if one uses stripes cut from name cards or plastics, I would not give the same amount of assurance.

Maple veneers

You can visit Art & Craft shops or wood shops to get larger piece of veneer. All you need to do is to cut out the required footprints.

Veneers cut into nut and saddle footprints

Pay attention to details; personally I will not leave the corners of the shims sharp. The corners are chamfered instead.

Maple veneer with corners chamfered

Last but not least, stick the shims to the nut and saddle. Use of super-glue for adhesion is preferred.

Maple Veneers made into shims, glued to the nut and saddle

The rest is just fitting the nut or saddle back where they belong.

Caveat; for those who are not familiar with removing guitar nuts, it will be best to view some video clips on YouTube regarding it. As for the drop-in saddle, it is much easier to deal with. In any case, make sure you have every step visualized in your mind to avoid making errors. A friend of mine uses this mantra to avoid making unforced errors in his work; Measure twice and cut once!

Have fun!

Wednesday, August 1, 2012

Bite Size Tips 002 - String Height @Nut

An Unbleached Bone Nut

There are many components on an acoustic guitar. Some which are very obvious and noticeable whereas some are inconspicuous but enduring. These passive components usually live through nearly the entire life span of any given guitar without breaking down. One may have lost count of the sets of strings changed as compared to replacement of those components. The guitar nut certainly fits the bill.

These are the basic functional aspects of a guitar nut,
1. Supports the guitar strings
2. Governs the string spacing
3. Enables guitar strings to vibrate with no obstruction
4. Ensures good playability
5. Increases the guitar aesthetic value

There are many aspects regarding guitar nuts. In this Bite-Size Tips edition, I will throw the limelight on point 4, i.e. ensures good playability. This actually means having the right string height at nut to stay away from string buzz and also gives comfort to its playability. The BIG question is; "How do we know what is the right height(s)?"

The first thing to learn is measuring the string height at nut. The following pictures have delineated the necessary steps and equipment you will need to accomplish this task.

1. Have you guitar tuned, place it in supine position. (ensure adequate cushion for protection)

Position your guitar properly


2. Start on any string; in this example, we shall start with the Lo E string
3. Press or fret the second fret of the Lo E string the regular way
4. Expect to see a narrow gap formed by the string and the crown of the first fret


5. Measure the gap using the right feeler gauge or a piece of cut regular office paper
6. Walah! The gap is measured!

Feeler gauge in use

Improvise with paper

Feeler Gauge (0.05mm to 0.5mm)

I shall stress that this method will give a relative measurement of the string height at nut. You should not expect to obtain the actual vertical height between the strings and the fingerboard regardless in mm or inches. If you insist of getting the vertical heights, you will find through experience that such measurements are hard to ascertain and they are barely useful as well.

In this article, I will address the measured space as "the gap". Most guitars get set up before they leave the factories or workshops. To eliminate any buzzing tendencies, the string heights at nut are usually generous. The gaps can vary from 0.40mm to 0.25mm. This can translate to vertical heights of 1.3mm to 1.6mm. Most accomplished players can handle such settings but not the beginners. While it may present as good training for beginners, it could be too tough for them. This is also the common cause for beginners in stopping to learn or play. Even the good players prefer good playability whenever possible.

Another common question; "Should the string height at nut be consistent for all strings?" It is probably a Yes/No answer. It has a lot to do with the player preferences, that is when the player is discerning of such adjustments. For those who are oblivious, it should be up to the guitar tech to recommend. Hopefully the recommendations are made with the guitar owner's interest as priority and not the convenience of the guitar tech. Below is a set of frequently used setting when I set up my clients' guitars, the measurements indicate separation of "the gap".

1st E - 0.10mm to 0.15mm
2nd B - 0.10mm to 0.15mm
3rd G - 0.10mm to 0.15mm
4th D - 0.15mm to 0.20mm
5th A - 0.15mm to 0.20mm
6th E - 0.20mm to 0.25mm

Some of you may wonder about the feeler gauge because not many people own one and let alone using it correctly. A regular office paper has thickness of 0.10 to 0.20mm. A common namecard is usually of 250 gsm weight and the thickness is about 0.25mm. If you don't have a feeler gauge, you can still make reasonable estimates of the "gap" by using paper or namecard.

One should bear in mind that wood built guitar will carry some degrees of inconsistencies especially in physical dimensions. Firstly wood is hygroscopic, i.e. wood absorbs moisture that leads to change in physical dimensions and wood is not perfect to begin with. I may vary "the gap" in accordance to the guitar's conditions and the owner's preferences.

Learning about the "gap"settings will naturally lead to the curiosity to make adjustments. The so called adjustment is actually deepening the nut slots by cutting them individually to attain the desired gap spacing. This task isn't impossible to undertake but it takes good practices to get the sweet spot. It is wise to practice on a subject before you embark to work on your guitar(s). Remember to sense the situation before you work on your guitar(s). If it is done blindly, the outcome can be tragically irreversible.

In closing, this article focuses on the means to determine if your guitar's string heights at nut are correctly set up or it is not. If you are able to successful determine the heights, it would be adequate. Making DIY attempts to adjust the string height at nut may not be advisable unless you are well practiced. Stay tuned for the next edition. Cheers.