


In the article 004A, I have featured string buzzing due to low string height. This one will discuss neck relief (resulted from neck straightness) instead. Before we proceed, string height and neck relief are two different attributes found on guitars. Don’t mix them up by assuming that they are the same thing. Lets’ begin by understanding neck relief, its meaning and functions.
There are a few ways to understand neck relief. Primarily it refers to straightness of guitar neck that resulted the amount of string clearance between the fingerboard or fret wires with the strings measured at 6, 7 or 8th fret. At least this is my comprehension of neck relief. It is essential to have sufficient neck relief because it governs string clearance, which in turn governs the tonal quality of guitars when played. Without string clearance, guitar strings will not have enough space to oscillate freely without being obstructed. This is one of the main causes for acoustic guitars sounding thin and choked.
Basically there are three types of neck relief situations.
1. Concave or “Bow” neck.
2. Convex or “Hump” neck
3. Straight neck
Below shows an image illustrating the three different situations.
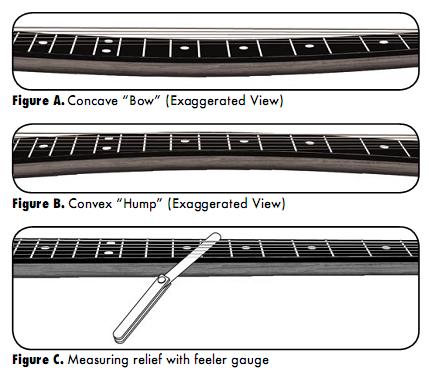
Taken from: http://www.rockwellguitarclinic.com/images/relief.jpg
Fortunately most acoustic guitars are fitted with truss rod with their necks. The purpose of the truss rod is to add strength to the neck and also compensate any neck distortion. It does so by a compressive mechanism built into most truss rods where two different rods of two differing length are used to produce the desired “distortion” to counter the natural ones. See below picture illustrated the working principles of such adjustable truss rods.

Taken from: http://proguitarshop.com/media/cms/blog/trussrodadjustment.gif

Taken from: http://i779.photobucket.com/albums/yy77/unclefogey/trussrod.jpg
There were fixed truss rods used in the past. Martin Guitars has introduced the Martin T-bar in the xxxx. Truss rods of the like are mean to add strength to guitar necks so as to resist neck distortion. However the immense combined string tension will inevitably distort guitar necks over time. Below shows three different types of truss rod ends.

Taken from: http://www.fretnotguitarrepair.com/images/truss-rod/martin-truss-rods.jpg
String buzzing related to neck relief is caused by convex or hump necks. When guitar necks distort in the convex manner, the string clearance will be reduced. As long as this clearance is adequate, the guitar still plays decently but once the clearance tips too far buzzing starts to pop up. Is a perfectly straight neck the most ideal? I still hear debate over adopting a perfectly straight neck and slightly bowed neck. The bottom line is to allow strings to oscillate freely.
Below are two pictures showing desired neck reliefs.


Taken from: http://www.frudua.com/manuals/imgmanuals/figura6manicoin.gif
So how do you know how much is adequate? In most guitar technical manual, a range is always recommended as oppose to a fixed figure because this neck relief thing varies between guitars and also players’ preferences. In short, there is no one size fits all neck relief. Once has to trial and error to get the sweet spot. By knowing enough, the process of trial and error can be shorter and more effective than shooting in the dark. The picture below illustrates a way to estimate neck relief. Keeping the low E string fretted on 1st and 12th frets and use the middle finger to feel the amount of relief at 7th or 8th fret. You should feel a slight clearance between guitar string and fret wires. If a 100GSM paper can slip through this gap, the neck relief should be sufficient.

Taken from: http://www.fretnotguitarrepair.com/images/neck/checking-neck-relief.jpg
Nothing beats doing the real thing. After much talks about the rhyme and reasons, it is time to get our hands dirty. Adjusting truss rods has been a sacred ritual and only to be tempered by experts. Actually it isn’t that scary a thing. If you’re not comfortable in tempering your thousands of dollars guitar’s truss rod, do send it to a qualified person to undertake this task. Before adjusting the truss rod, make sure these things are in good order,
1. Nut and saddle are well set up, no issue with string height
2. Fret wires are not worn off excessively or uneven
It is essential to consider the above attributes because if they are the actual cause for string buzz, adjusting truss rod might be like barking at the wrong tree.
Here is a typical situation; after estimating the neck relief by hand you found that the neck relief was not adequate, or there isn’t any. You are about to adjust the truss rod.
Prepare the following equipment,
1. Truss rod wrench. It can be an allen key of socket wrench. Be sure to use the right tool as recommended by the guitar manufacturer.
2. Feeler gauge, name cards or a piece of 100GSM paper
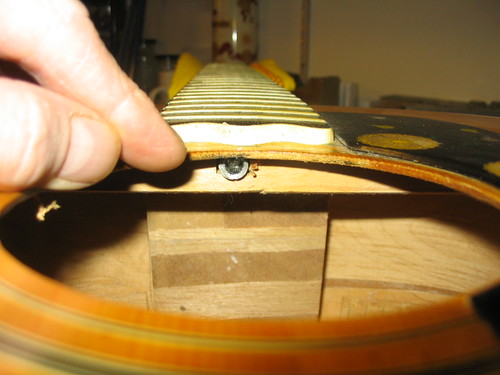
Once you have fitted the truss rod wrench into your guitar properly, you are ready to turn it. By rule of thumb, you should always look at the truss rod end to determine the correct direction of turn (adjustment). The picture right below illustrated truss rod adjustment at the headstock. Since this situation is about creating more neck relief, you should be turning the truss rod anti-clockwise. Another words you are loosening the truss rod thus giving it the concave or bow curvature. This will result in more neck relief which leads to more string clearance between strings and neck. If you guitar’s truss rod end is within the soundbox, it is trickier as you would have to circumnavigate around the strings to do so. See the pictures below to get the idea.
A common FAQ; should I remove or loosen all strings before adjusting truss rod? It isn’t necessary because you want to adjust truss rod when the guitar is loaded with the regular string tension to achieve the “reality” in adjustments.
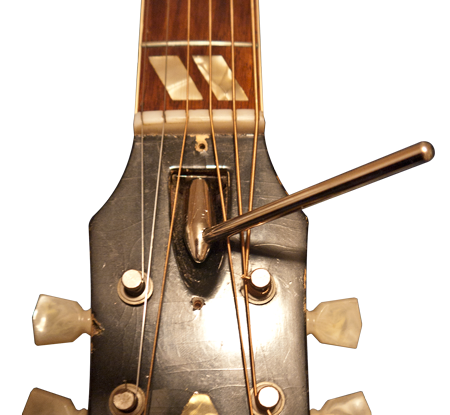


Taken from: http://www.guitarrepairbench.com/acoustic-guitar-repairs/images/acoustic-truss-rod-adjustment.png
Taken from: http://farm4.static.flickr.com/3455/3368070468_f542e5b2fe.jpg?v=0
Taken from: http://i2.ytimg.com/vi/IdCZEKGVZfA/mqdefault.jpg
Taken from: http://www.stringletter.com/var/ezwebin_site/storage/images/media/agu/courses/acoustic-guitar-care-and-maintenance/how-to-set-up-your-guitar-part-1-truss-rod-adjustment/photo-gallery/truss-rod-through-soundhole/708375-1-eng-US/Truss-rod-through-soundhole_imagelarge.jpg
Taken from: http://www.sunsetstudio.net/images/trussadjust.jpg
Do not make big turns. Each turn should be no more than a quarter. After each turn, leave the guitar for about 30 minutes for the eventual curvature to set in. You can again measure the neck relief or play your guitar to determine if further adjustment is needed. You can determine the adjusted neck relief by pressing on the 8th fret while the low E string is pressed on 1st and 12th frets. Alternatively you could use the 100GSM paper to determine the desired neck relief. Repeat the illustrated processes if necessary.
The most important thing isn’t the neck relief measured figure. It is the playability. You should play the guitar to decide to adjust further or stop. Wish you the best. Thanks of reading!