Promotion Items

the KILN @Indiegogo
4hr Courses

Dear Friends, Guitaring Passionately has began its inaugural acoustic guitar making process in early 2017. Do stay tuned to the progress thru instagram and Facebook.

Check out our Price Busters

Learn practical guitar maintenance skills in our 4hr Courses. Brochure Download here
Showing posts with label Neck Reset. Show all posts

Monday, February 16, 2015

The Lesson Beneath Neck Resetting - Part 2

Getting it right the first time doesn't mean you will get it right again.

Not long after getting my Gibson's neck done I got another opportunity to reset a vintage Martin D-18. It was built in the 60s. Back then, the fingerboard and bridge were made from Brazilian Rosewood. Those were the days, the Golden Era for acoustic guitars; only the best materials were used.

If you are keen to try some vintage guitars, you can find many in Heirlooms Music at Lichfield Road. Click here to view more pictures.

A1965 Martin D-18 available at Heirlooms Music
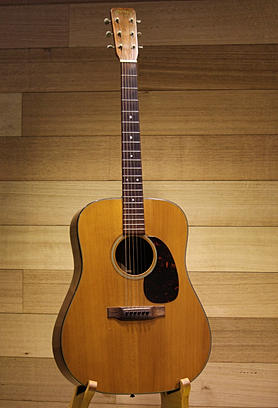

Taken from: http://static.wixstatic.com/media/4bb691_6ea9ef48112b422cacbbdd3e408d9849.jpg_srz_p_278_408_75_22_0.50_1.20_0.00_jpg_srz

Since I have done neck reset jobs, it was natural for me to use the same steps that work. However, this particular neck reset job has reduced my thoughts to an assumption.

Finally the vintage Martin arrived. The neck angle has indeed altered over years and age has taken its toll on playability. To maintain comfort playability, the saddle has been trimmed gradually until it has very little crown height protrusion over the bridge slot. As shown in the picture below, the saddle was almost flushed with the bridge.

Low Saddle Height

I carried out the same steps without missing a beat until… the neck just wouldn't relent. It remained unmovable despite my attempts to remove it.

These are the "same steps" I have carried out.
1. Removed 15th fret wire
2. Dislodged fingerboard from top
3. Drilled hole into the fingerboard at 15th fret slot
4. Retrofit a tube to a espresso machine to deliver steam
5. Built a jig for neck removal
See series of pictures below.


With step 1 to 5 done, how can anything go wrong? In fact the ordeal has started… in total I made 5 attempts to "steam-the-neck" and I got nowhere. In the process, the neck removal jig gave way, it was unthinkable…  I have repaired and reinforced the neck jig to such strength that it is capable to crush a guitar. See picture below.

Original Neck Jig

Reinforced Neck Jig

I was perplexed and confused by the outcome. It set me on a root cause seeking mode for weeks. Trawled the internet for answers, writing emails to my luthier buddies for advice, desperately modifying jigs and equipment, etc. Finally an advise from Elderly Instruments made the critical difference.

It was step 3 of the "same steps", drilling a hole at the 15th fret slot. Most neck reset tips found on internet mentioned this step. When drilled accurately, it allows steam to be delivered into the dovetail joint thus dislodging the neck from the body. However many sources didn't emphasize accuracy instead they merely mention it as one of the steps.

It was imperative to determine the dovetail joint position on the fingerboard accurately. Using a spatula, I move it under the dislodged fingerboard until it hit the dovetail. That gave me with reasonable accuracy the position of dovetail joint on the fingerboard. I marked the position with a masking tape. In this case, the dovetail joint was close to the 15th fret but not at it. Two holes were drilled to allow entry and exit of steam.

Determining dovetail joint
Taken from: http://farm3.static.flickr.com/2182/2353308000_253961505b.jpg

It took less than 5 minutes to see water exiting at the neck heel whilst steam was flow in and out of both drilled holes. That was the indication that the guitar neck was poised to be removed from its body. The neck removal jig did its job easily and finally.

Neck removed, with glue residue
Cleaned, adjusted, ready for re-gluing

The joint was cleaned up, neck angle was re-adjusted, the required shims were prepared, and the easy part was to glue the guitar neck back to its body.


After the neck has been reset, it was usual to check on fret level with respect to the adjusted neck angle. It wasn't unusual for some frets to buzz. So the fret wires were leveled. This job concluded with a new bone saddle and set up. A new saddle was necessary because the original saddle was too low in its crown height (see picture below).
Personally, it was a damn good lesson learned.


Thanks for reading!

Monday, June 23, 2014

The Lesson Beneath Neck Resetting My Guitar

Guitar Neck Reset Process

Before I get to my perspectives of the lesson beneath, please allow me to introduce the events that lead up to it. Here goes.

Just when we assumed that qualities of goods get better as their prices get higher. Is that universally true?


Gibson SJ 200
Some years back, I decided to find out if expensive guitars better in every way than budget guitars. There was no easy way to test the hypothesis except to buy expensive guitars. So I did.

I have taken an interest in Gibson Acoustic guitar especially the Super Jumbo (SJ) shape. My first one was the workhorse SJ200. It was a spruce top/maple back-side combination. It was indeed impressive considering I had never owned an expensive guitar before.

Back then; my “tone” vocabulary was rather limited as well. While I can identify my preferred tone, I didn’t have sufficient adjectives to articulate it in words. I got by with just relying on preferences, which were largely based on feelings.

Guitar enthusiasts hardly stopped at one guitar. So my appetite for better guitars began to develop. To me better guitars were more expensive guitars, at least during those formative years. That kick started my Guitar Acquiring Syndrome, a.k.a. GAS.

Next in line was Gibson SJ300. It was a spruce top/rosewood back-side combination. The tonal quality was not exceedingly better then my SJ200 but it has higher aesthetic value.

Gibson SJ300

I took a break from Gibson and switched to Guild for a brief moment. I bought a Guild F50R which was a spruce top/rosewood back-side combination. Even at a lower price point than both Gibsons, its tonal quality was comparable.

My confident with expensive guitars began to waver. Not dissuaded by my F50R’s impact on my Gibsons, I decided to move up the price chain again. I went hunting for a Gibson Montana Gold. It didn’t take too long for me to land one in my hands. This piece was classed under Gibson Custom Shop. For guitars that were from Gibson Custom Shop, it was to believe that materials were hand-selected and the guitar was hand-built by a team of selected luthiers in Gibson factory in Bozeman Montana. In short, it is an expensive acoustic guitar.

Guild F50R
Gibson Montana Gold
 I wasn’t disappointed with the Montana Gold at all. In fact it was arguably the best sounding Super Jumbo I have had thus far. It was indeed a very satisfying buy. My GAS subsided for a period.

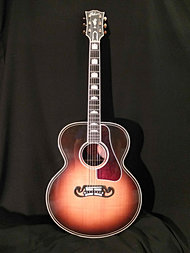
The singing cowboy model was always in my mind ever since I set my eyes on super jumbo models. In 1937, Gibson guitars built a SJ200 shaped guitar for Ray Whitley and they called it the Prewar Western Classic model. It was just a notch lower than the SJ-250 Monarch. Without much hesitation, the SJ200 Prewar Western Classic became part of my collection of expensive guitars.

Gibson Western Classic
Among all my Gibson acoustic guitars, the Prewar Western Classic was the most expensive buy and it was also the tipping point to the hypothesis “better guitars were more expensive guitars”. The build was didn’t match the price point and her claimed prestige. It has structural, functional and cosmetic issues that needed repair/restore work. I almost couldn’t believe it. It was playable but the issues have affected the expected performance levels of the guitar. It was indeed very disappointing to get such a poorly made piece.

In retrospect, these guitars weren’t considered hi-end yet when compared against fully handcrafted acoustic guitars. Established luthiers like Erwin Somogyi, Kevin Ryan, Grit Laskin, Charles Fox, etc. can command any where from USD $12,000 to USD $60,000. However I couldn’t have known what I didn’t know. So have I learned my lesson. GASing for branded and expensive guitars doesn't guarantee satisfied purchases.

So why did I neck reset my Gibson? I shall place my Prewar Western Classic in the limelight henceforth herein.

After the excitement of selection, I eagerly waited for my Prewar Western Classic to be delivered to my residence. When I finally received the package, I opened it up with high expectations.
The first glance was impressive. The finishing was near perfect and sexy as it was.

For a week, I played it as like any new toys. It didn't occur to me it was just satisfaction instead being elation. Perhaps I have chosen to believed that it was a good piece. I was simply blinded to the blemishes before my eyes.

It didn't take long to spot a string of issues on this guitar, ironically it was my most expensive one during that time. There was a straight trail of lacquer check at the back of the neck. It covered the entire length of the neck and headstock, following the mahogany laminate. It was a cosmetic issue.

There was something else not immediately observable. Only after a couple of months of playing that I discovered the neck angle was not set properly.

The playability worsen and I have tried various adjustments to get it back in shape but my effort was futile against the overriding effects of its neck angle.

While I didn't require guitars with perfect set up to play them, this piece was hard to fall for. The gradual forward bowing in its neck exacerbated my dissatisfaction with it. Eventually it has reached tipping point and I was adequately motivated to rectify this neck angle issue.

The Cure became Worse than the Disease


Back then, I was not skillful enough to undertake a neck reset job on an acoustic guitar with glued set neck. The obvious choice was to seek for experts in this area. I found a guitar tech who would accept my job request with a price, of course.

With anticipation and expectations, I sent my Gibson to this guitar tech for the ultimate rectification. After I have waited eagerly for three weeks I received my Gibson. To my disbelief, the neck angle didn't get adjusted to the appropriate angle. Topping up my disappoint, the purfling and binding at the neck heel part was damaged.


The service transaction process was done through a retail person thus I didn't get to meet the guitar tech. Not entirely satisfied with the work, I returned my Gibson to the guitar tech for a rework.

Another three weeks have past and I receive my Gibson from the retail person. There was no noticeable difference in its neck angle. I later realized through the guitar tech's confession that nothing was done to my Gibson within the period of reworking.

It was yet another disappointment. I couldn't fathom that level of professional standard displayed by that guitar tech. All these further motivated me to take on the neck reset job on my own. Which eventually I did.

The Neck Reset Process


Thankfully for the training I have received from Jeffrey Yong and the years of experiences from guitar repairs, I was poised to undertake the neck reset job. My guiding principle to ensure high chances of success was best described with this, "measure twice, cut once".

By the time I was ready to began the physical work, I have already done considerable amount of research on neck reset jobs.

Base on my comprehension, these are the major sub-tasks that constitute the entire neck reset job.
  1. Dislodge neck tongue from top plate
  2. Remove 15th fret wire
  3. Drill a hole into 15th fret slot
  4. Introduce steam into dovetail joint thru the hole
  5. Make a guitar neck removing jig
  6. Remove guitar neck using the jig
  7. Modify dovetail joint for better guitar neck angle
  8. Re-glue guitar neck to soundbox
  9. Refit frets and level frets if required
  10. Set up guitar for playability
Within a single guitar repair job, there are many sub-tasks that require their respective skills and knowledge. This aspect is usually oblivious many guitar enthusiasts. Unintentionally they over simplified many guitar repair jobs.

I think guitar techs should do their parts in educating their clients. More than often, guitar enthusiasts feel that guitar repair jobs should be pegged to the value of the guitar in repair.
They made this assumption without understanding how things actually work in guitars. Going with this will soon put many guitar techs out of job because no consideration is placed on their experience levels and time spent.

This isn't about exalting guitar techs. My clients feel assured when they understand repair processes that include both pros and cons. I think this aspect is very important in understanding the expectations of my clients. Most people expect repair jobs to return their guitars to brand new state. That isn't accurate thinking because repair jobs are about solving problems. Only restoration jobs will strive to return guitars back to origin state.

Even a properly executed restoration job will not guarantee that ideal brand new state. I will try to get my clients to accept and understand certain realities that are inevitable. Making empty promises will get you the job but it will create great disappointments later.

Staying true to my clients and myself is a guiding principle that works very well for me so far. So much for the introduction, let the repair begins now!

After hours of research on guitar neck reset job, I have decided to build a jig for two key reasons,
  1. Hold and secure guitar body
  2. Mechanism that specifically remove guitar neck from guitar body
Bryan Galloup is a respectable guitar builder who is conversant in both making and repairing guitars. Inspired by his design, I made a Guitar Neck Removing jig.

Guitar Neck Removing Jig

This jig enabled me to secure the guitar soundbox a.k.a. guitar body in ways that help in the later neck removal process. There was also no worry in damaging the guitar.

Dovetail joints are not straightforward in removal. Steam must be introduced to the contact surfaces. For that, I use silicon tubes to make a delivery device to channel steam to a syringe needle.

Silicon Tube

Prior to starting the process, I tested the jig and tube for their reliability and workability. Both devices worked well. I went on with the neck reset job with confidence. I became more proficient in repairs and that was definitely a benefit. Above all, the shift in attitudes towards guitar qualities in relation to prices was the greatest I gain from my Guitar Neck Reset Job. Praise HIM again.

I shall let the pictures do the talking from this point onwards.

Neck Removed
Glue Residue

Glue Residue

Glue Reside Cleaned

Glue Residue Cleaned

Glue Residue Cleaned

Glue Residue Cleaned

Glue Residue Cleaned

Glue Residue Cleaned

Tongue Shim

Tongue Shim

Tongue Shim

Tongue Shim Glued

Tongue Shim Glued

Masking Out to-be-trimmed Areas

Altered Neck Angle

Altered Neck Angle

Altered Neck Angle

Glued & Clamped

Glued & Clamped